This is the best canned green beans recipe! Transform your boring, mushy canned green beans into a delightfully crunchy and flavorful great side dish.
This canned green beans recipe puts all other canned green beans recipes to shame.
Fresh green beans are fairly common in recipes, but canned green beans aren't something we often think of as a go-to when cooking. Most canned vegetables are mushy and flavorless.
Remember that holiday 'green bean casserole' or 'southern green beans' recipe that takes canned green beans and cooks them in a can of cream of mushroom soup, then tops them with canned fried onions?
Yeah, yuck. Let's give canned green beans a chance to redeem themselves, shall we?
With a bit of love and finesse, we're going to transform those mushy canned green beans into something easy enough for weeknight cooking but also worthy of your holiday table.
Let's convert all the canned green bean haters to canned green bean lovers! All you need are a few simple ingredients that you probably already have in your pantry.
Make this green bean recipe anytime of year - Thanksgiving, Christmas, or just because.

Jump to:
The most common canned green beans recipe
In researching the internet, it seems that there's a common way to cook canned green beans - and from what I can tell, it's pretty much the only method you'll find unless you dig deep.
Now, I haven't tried cooking them this way, so it's not fair of me to pass judgement on it. That being said, I don't know that I'm a fan of the idea of taking an already mushy, wet vegetable, and soaking it in a bunch of water for a really long time.
It sounds...mushy.
Ali over at Longbourn Farm sautés hers, and uses onion powder as her secret ingredient, and I'm not gonna lie, they look pretty tasty!
For today, though, we're going to sear those canned green beans on the stove top, and give them a nice little crust, then pair them with some ingredients that pack a punch of flavor.
This is an easy recipe that doesn't require fresh vegetables but instead cooks a grocery store staple in a delicious way.
What is searing
Searing is a technique used in grilling, baking, braising, roasting, sautéing, etc., in which the surface of the food is cooked at high temperature until a browned crust forms.
It's usually used for meat and fish, but you can use it for veggies too! (Even canned ones.)
How to make canned green beans crispy
Not only is this recipe flavorful, it also only takes about 10 minutes to put together from can to table. Need to serve a crowd? Double or triple it and grab a big saute pan.
First, we need to make our cashew garlic mixture. Add the cashews and garlic to the food processor and pulse. You're looking for a fine chunk. Does that make sense? Chunks, not dust. But a fine chunk.
Now, here's how we make canned green beans crispy. You're going to sear the outside of the green beans in a very small amount of oil. Your pan needs to be HOT. Not just hot, but like HOT HOT.
For the oil, you're going to want to pick something that can hold up to high heat. Olive oil has too low of a smoking point and won't work here. Bacon grease, avocado oil, or others with a 'high heat cooking' ability is what you're looking for.
Drain the can of green beans of their liquid, then toss them into the hot oil.
When those suckers hit the pan, they should sizzle. Make sure your fan's on high!
You're only going to let them cook like that for 30-60 seconds. All we're working on is forming a crust on the outside and getting them warm.
Then, you're going to flip, and sear the other side. It won't be perfect - just toss and do the best you can.
Add your cashew mixture to the pan and toss. Get them a little toasty!

Now, here comes decision time. I add my red pepper flakes with the pan still on. Just know that RPF + high heat = spicier than normal RPF.
You can adjust the amount of RPF to taste. If you wait to add them to the pan after removing it from the heat, it won't be quite as intense.
So, how spicy do you want your beans? Adjust accordingly.
Remove the pan from the heat if you haven't already, then sprinkle with the red wine vinegar and toss to combine. The vinegar will sizzle, but it will also help to deglaze the bottom of the pan and scrape off all the good tasty bits.
Sprinkle with salt and a little black pepper if you'd like and serve.
Easy enough for the dinner table on a weeknight, fancy enough for holiday meals, a dinner party, or other special occasions. Vegetarian, vegan, gluten free, dairy free, soy free, and delicious. WINNING.
What to serve canned green beans with
This canned green beans recipe is one of our favorite side dishes - they would go really well alongside a mustard glazed pork tenderloin or some tender chicken breasts for a weeknight dinner.
You could also incorporate them into a stir fry. What about serving them over some rice or cauliflower rice, then topping with chicken?
I'm thinking I might take my easy weeknight chicken stir fry recipe, and swap out the frozen veggie bag for these beans.
Yum.
If you're looking for a good recipe using fresh beans, my potato and green bean salad is a family favorite. It would be even better with some crispy bacon added in!
Recipe
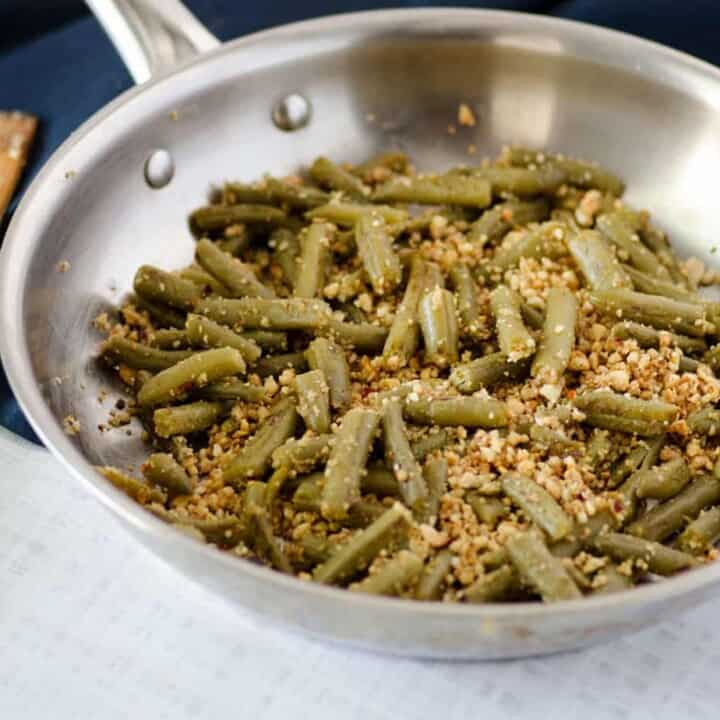
Pan Seared Canned Green Beans with Cashews and Garlic
This canned green beans recipe transforms boring, mushy canned green beans into a delightfully crunchy and flavorful dish.
Ingredients
- 1 15oz can green beans
- 1 teaspoon avocado oil
- 1 large clove garlic
- ⅓ cup roasted salted cashews
- 2 teaspoon red wine vinegar
Instructions
- Drain and rinse your green beans.
- In a food processor, pulse your cashews and garlic until they form a chunky mixture.
- Heat a skillet over high heat. (Yes, high! Not medium-high. HIGH!)
- Once it is hot, add your oil and give a quick swirl to coat.
- Add the green beans to the pan right away (the oil will start to smok e if you don't!)
- Sear the green beans for 30-60 seconds, until a char has formed on the outside.
- Toss/flip and sear the other side.
- Add the cashew and garlic mixture to the pan. Toss to combine.
- Add red pepper flakes and toss again.
- Remove from heat. Sprinkle with the red wine vinegar and a pinch of salt and serve immediately.
Notes
If you don't have avocado oil, use another high heat cooking fat. Other recommendations would be ghee, bacon grease, or coconut oil. Butter will BURN at this high of a temperature!
These are best served immediately after cooking. If you need to store them in the fridge and reheat, simply repeat the high heat searing process. Be aware that putting red pepper flakes over high heat does intensify the flavor, so if you are wary of extra spice, you may want to leave these out and add them when reheating or at serving time.
Recommended Products
As an Amazon Associate and member of other affiliate programs, I earn from qualifying purchases, at no additional cost to you. Thank you for your support!
Nutrition Information:
Yield: 2 servings Serving Size: 1Amount Per Serving: Calories: 179Total Fat: 9gSaturated Fat: 2gTrans Fat: 0gUnsaturated Fat: 7gCholesterol: 0mgSodium: 94mgCarbohydrates: 22gFiber: 7gSugar: 8gProtein: 6g
I may earn a small commission off purchases made through affiliate links in this post from Amazon and other sellers. This helps me continue to run the blog and keep providing you fresh content. Thank you for your support!
I may earn a small commission off purchases made through affiliate links in this post from Amazon and other sellers. This helps me continue to run the blog and keep providing you fresh content. Thank you for your support!


Mary Burton
Since a family member is allergic to most nuts but not walnuts, how much would the flavor be altered using toasted walnuts. Or would they even be suitable for your recipe? I’m excited to try it per your recipe….it sounds wonderful.
Jessica
Hey Mary! You could certainly use walnuts. It will adjust the texture a bit, as walnuts tend to be a bit softer, but I think if they were already roasted when added they would work just fine!
Carmen Boucher
This was so tasty.... even my dad, who hates vegetables, wanted me to make a second batch. I added some feta to the second batch once the beans cooled off a bit. This recipe is a keeper!!
Jessica
Yay, so glad you enjoyed it! I love bringing new life to canned veggies 🙂